How to Take Better Garden Photos
- Lana Dion

- May 22, 2023
- 8 min read
Updated: May 31, 2023
I'm not a professional photographer, but photography is a long-time interest and I completed classes in high school and college, so I'm familiar with the basics and critiquing photos for improvement.
Here are a few tips and concepts to give your photos an extra oomph! =)
Move closer!
This is often the biggest and easiest way to take a photo from "meh" to "nice!" Whether you physically step closer (my dad called this "manual zoom" 😅 #dadjokes) or use a telephoto lens, filling the frame with the subject can make a world of difference! This is especially important with phone cameras, which usually have a wide-angle lens for taking selfies (and can result in distortion, particularly on the edges). Try it out - choose a subject and take several pictures, moving/zooming closer with each one, then see which catches your attention most while scrolling through the results!
One of my photo teachers would take everyone's prints from a project and tape them to the board at the front of the room, then we'd see which would stand out the most. This is especially helpful nowadays; in an age of thumbnails and scrolling on mobile devices, most people are not viewing pictures from a full-sized computer screen or an 8" x 10" print!
Note that zooming in digitally (with a phone or digital camera) can result in loss of quality, so that warrants consideration. Cropping the photo afterward may, in some cases, retain more quality. Still, there is a point at which the loss of quality from cropping too much is not better than just leaving the subject a little smaller. I encounter this with critter photos (especially insects), when they quickly move away before I can catch a closer shot. Sometimes it's better to have a smaller, clearer bee than a blurry/grainy/pixelated blob, haha. Similarly, even with a quality telephoto lens there are times when zooming in too much can diminish quality, particularly in low light.


Photos: American water willow (Justicia americana), 5/23/22 - what a difference with an up-close shot, especially for small flowers!
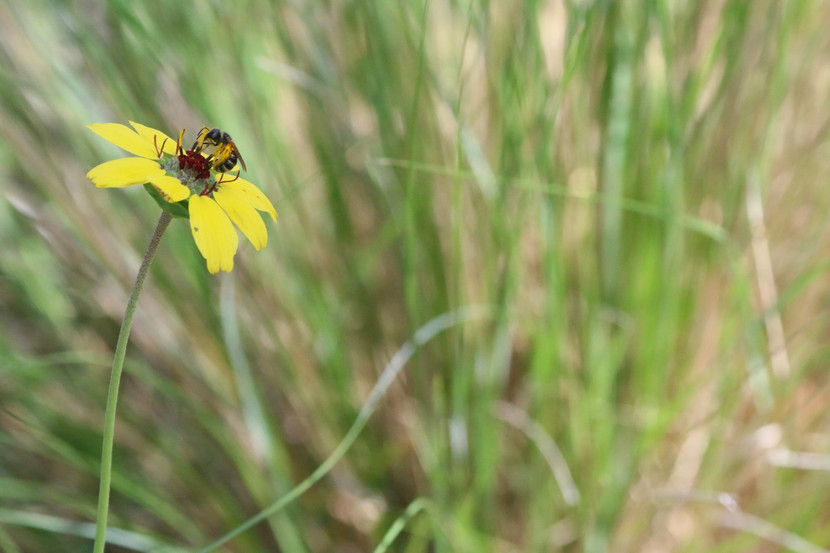
Composition & color
Really the first tip is part of composition, but I believe they each warrant emphasis. Composition is the placement of various elements/subjects in the photo frame, regardless if you have one subject or several. You want to look at where everything is in your frame. Typically we're inclined - and often for good reason - to put the main subject(s) in the center of the frame; however, sometimes moving your camera to place the subject elsewhere makes for a more interesting photo.
Think of the "rule of thirds" - imagine the frame divided into three equal sections, then place the subject in the first or third section, or right on the line. Sometimes this may allow more background for context, or give a greater sense of movement/direction. For example, if you leave more space in front of a bird about to take off. I also often use this when taking a photo for the purpose of editing to add a quote; I place the main subject to one side, maybe in a corner, and try to leave plenty of space - hopefully well out of focus and without a lot of color variance - in which to later add wording.
Remaining mindful of composition can also help prevent cutting off part of a head or flower, for example. Sometimes there are extra flowers right on the edge of the frame and moving slightly makes the difference between including them completely or having only part of a flower, which can leave the picture feeling cut-off and incomplete. Or, moving slightly to completely exclude an element can help retain the viewer's focus where you want it to be. I sometimes run into this when there is something bright in the background that becomes distracting, like a cheery yellow flower stealing the show from a deeper-shaded subject (looking at you, plains coreopsis [Coreopsis tinctoria] behind the prairie coneflowers [Ratibida columnifera], haha).
There are two examples there that mentioned color, which also plays a part in how you compose your photo. Sometimes this takes the form of excluding a flower that's not a complimentary color to the main subject, sometimes it's changing my angle so I have green leaves in the background instead of the bright cement of the sidewalk or road, which can throw off not only the mood and how the color of the subject comes across but also the lighting and exposure. Often the bane of my backyard photos has been the wood fence, which shows up bright and reddish in sunlight, haha! I have even taken a white poster board outside to block off all the nonsense behind a flower.


Photos: chocolate daisies (Berlandiera lyrata), 5/13/23 & 5/1/23 - note use of rule of thirds vs. center framing; both good, but different. Off-center gives sense of space, flow, and smallness of flower and bee, with room to add a quote over photo. Center frame fully showcases the flower and nothing else.
Lighting
I believe lighting is what really sets the professionals apart from amateurs, and admittedly it's not my strong suit. In addition, some of the most "stunning" photos you may see online are often heavily edited in post-production, which I simply don't like messing with that much. However, there are some things we can do while taking photos to make a big difference! Factors to consider are time of day, cloud cover and shade, and backlighting and exposure settings.
Afternoon. The quality of sunlight changes throughout the day (and depending on location in the world), with mid-day being the most direct light, which gives the harshest shadows and is least flattering (for people and gardens). You can try to fill in with flash if you're close enough to the subject, but even so I think it's not ideal. Afternoon is still harsh light, and while the shadows may not be as severe, they are longer.
End of day, shade, and clouds. Sunset can be really pretty (you may have heard the phrase "golden hour"), but it can also change the colors of things, which can be good or bad depending on what you're trying to do. At dusk the light is fading so you can lose color and quality; shutter speeds have to slow down to take in enough light, which can lead to grainy or blurry photos. Photographing in the shade can cause a similar problem, as well as changing the tone of color. I have a setting on my camera that bumps up the saturation to try to get closer to real colors or give more contrast in the gray flatness of shade. You can also try adjusting the white balance. In some ways a lightly-cloudy day is good because it diffuses the light, removing harsh shadows. I'm not always a fan of the loss of color on cloudy days, though, so I also use the higher saturation setting in those times. It's especially challenging on those days when the sun plays peekaboo behind clouds, haha.


Photos: wildlife pond on 5/21/23 at 12:46 p.m. and on 5/13/23 at 9:58 a.m. taken with phone camera, so not best quality. Note the yellow, harsh light and dramatic shadows but brighter flowers at mid-day vs. softer light and less shadows in partly-shaded morning, bringing out ripples in the water of bird bath, but phone caused white balance to be very blue/green in the shade. Pros and cons to each.
Night. Of course, at night there is little to no light, so flash is almost certainly necessary. Most folks will only have the built-in flash on their phone or camera, which is direct, unflattering light. I have a flash attachment on my camera which can swivel to allow bouncing the light off something, which helps diffuse it, but sometimes when you're outside there isn't anything from which to reflect the light. I have also found that the top-mounted flash attachment often isn't sufficient for photographing small insects close-up, so eventually I'd like a ring light attachment that goes around the lens. In the end, I personally don't prefer night photography and usually only do so to simply document something, but not going for anything spectacular. I'm not saying it can't be done, I just don't have the equipment or desire to hassle with it, as I think is the case for most people.
Morning. My very favorite quality of light is in the morning! It's gentle and sweet. However, I'm not a morning person so I rarely end up actually shooting in the morning, haha! If you know you want the most flattering photo possible and you have the opportunity, I suggest morning.
Backlighting and exposure settings. Try to keep the sun at your back so you don't end up with silhouettes (unless that's what you want). If your shot is still backlit due to something in the background reflecting the light back, like that bright sidewalk and street cement I mentioned, or you don't have the option to move, you'll probably need to overexpose your shot - that means forcing the camera to take in more light so you can see the darker area, rather than using the automatic setting for the bright background. This will "blow out" the bright area, but that's not your subject, anyway. Phone cameras should have a shortcut and/or a manual setting to adjust exposure, or sometimes if you just angle away from the bright spot a bit it will help the camera to meter for the area you want, or you might be able to tap on a different part of the frame to meter and focus for that area rather than what is taking up most of the frame and where the camera is metering first. Other times in which you may need to overexpose even if the light is in the right place could be with a small insect on the underside of a flower or a close-up shot of a bright flower, causing the camera to meter lower for the bright reflection of light and making the flower too dark. Conversely, there might be times you want to underexpose, meaning not allowing in the amount of light for which your device meters. Sometimes I use this when I'm photographing a sunset or the texture of clouds and I need less light in order to bring out the colors and shadows. I also sometimes need to use this for dark-colored flowers to achieve a shot closer to their true color.
Increasingly, phones and other digital cameras have user-friendly shortcuts in the settings, which are worth exploring. One of these is the HDR setting - this assists with a balanced exposure when there are varying light intensities.


Photos: assassin bug nymph on prairie coneflower (Ratibida columnifera), 5/21/23. Note that the camera's auto-metering made the shot too bright because of the dark color on the flower petals. Under-exposing just a little resulted in more accurate coloring and less blow-out on the yellow portion of petals.
Purpose
Keeping in mind the purpose or function of your photo is also helpful. Even if you simply want to document the presence of a species (like to upload to iNaturalist), it can still be fun to take better photos that are more enjoyable to view. Sometimes, however, I want to document when a flower opens and where it is in relation to other plants in the garden, in which case the typical composition guidelines may not apply. Or sometimes I'll take the close-up flower shot and then a wider shot that shows that plant in relation to another plant (hopefully a perennial that's in that location long-term) or some other orienting item in the garden. This is especially helpful in winter and early spring when most plants are small rosettes and easy to "misplace" but I still want to document their growth.
It can also be helpful to take several versions of a shot. Even if at the moment you're focusing on the insect on the flower, later you might be looking for a shot of the flower itself! This is much easier now in the digital age, when we don't have to pay for film and development (maybe only storage space to back-up photos, haha). I have also taken to documenting the garden as a whole and sections of the garden(s) throughout the year for reference. Not sure if that spot where you're planting a perennial will have the same light in summer as in fall when you're planting? It'd be great to have a photo to check for that! =)
Happy photographing!
I hope this gives you some ideas for experimenting and improving your photos. Most of all, have fun with it! =)

